Very often when aftermarket radios are bought, they are brought to autoelectricians and installed without the customer having any idea of how or what was done to put the unit in. Replacing or upgrading parts (such as digital TV amplifiers) sometimes becomes unnecessarily pricey as the vehicle is brought back to the mechanic for quite a simple job.
Luckily, we at Elinz Electronics have taken the time to write the very basics of car stereo installation, including an explanation of the wiring, what they all mean, and where they should all be connected.
(This is not to be taken as an installation guide. Elinz Electronics encourages customers who are unfamiliar with installation to get the unit installed by a professional to prevent accidental injury.)
Radio installation kits
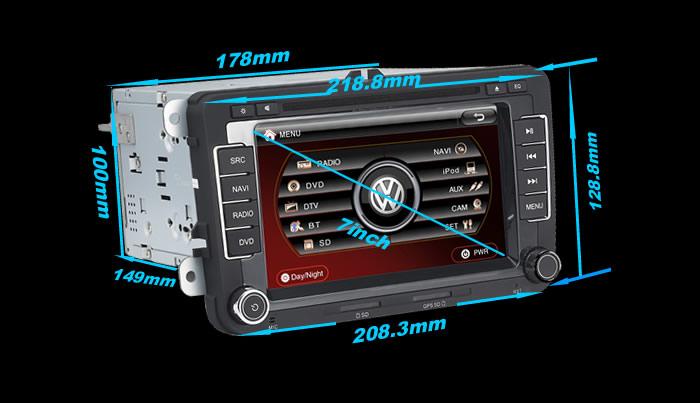
Simply put, the radio that is factory installed by the car’s manufacturer is nearly always a different shape and size to an aftermarket in-dash system. Compare the images of our Volkswagen and universal units, looking mainly at the shape of the body and the screen (ignore the screen tilt of the universal unit; it can be tilted back up):


Factory radios are very often larger in size than universal aftermarket radios. In order to accommodate for the size difference, installers commonly use a fascia which goes around the body of the universal unit to make it sit flush against the surface of the dash.
One question about installing an aftermarket radio is how to secure it into the dash. Factory radios are often manufactured with screws and mounting brackets permanently attached so that removing the unit also removes all methods of attachment. Radio installation kits are designed either with the mounting brackets already attached or with slots for appropriately sized tabs to be inserted. Once the kit is attached to the stereo, it is able to be installed and screwed securely into place.
It is important to understand that there are HUNDREDS of radio kits available in the market. When purchasing a radio kit, the precise car model and year of manufacture must be quoted to the auto sales representative to ensure that the right kit is purchased for your vehicle. Car dashes, even those made by the same manufacturer, can greatly vary from year to year.
The wiring loom
Previously, many aftermarket radios were created with wires connected internally to the unit's circuitboard and extending out of the back of the radio. However, nowadays most in dash systems have wires going into a plastic connector which snaps into the rear of the unit. This allows installers to snip and solder wires without a big bulky radio getting in their way.
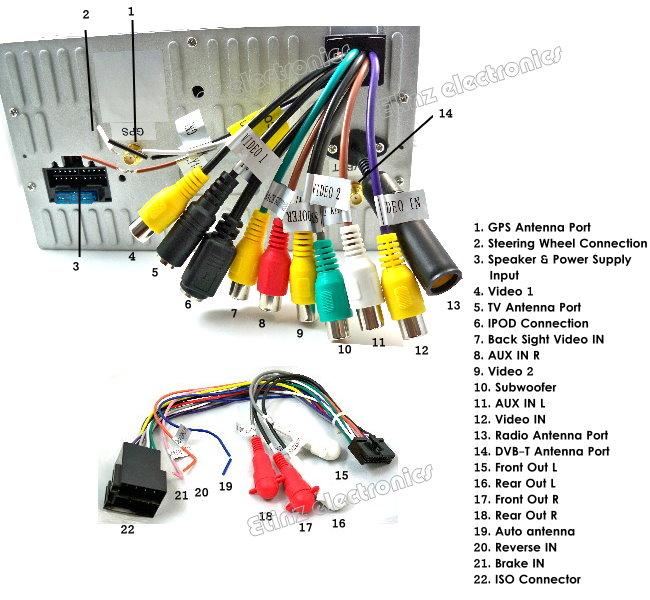
All of our units come with wiring looms. For a visual image of what we're referring to, have a look at this picture of the back of our Platinum unit:

The wires at the bottom is the unit's wiring loom. The thinner end snaps easily into the hole in the unit (marked #3). An installer would either cut the larger end to hardwire the unit in, or use an adapter to connect the unit directly to your vehicle's dash wire harness.
Getting an adapter
There are several advantages to purchasing an adapter. Adapters allow for car stereos to be easily clipped onto your car's existing harness without the need to cut and solder wires.

Reasons for not cutting your existing car’s radio wire harness include:
-
Possibly voiding the warranty of new vehicles
-
Allowing for the original car in-dash system to be plugged back in if the car is sold off
-
Cutting the radio’s harness exposes all the wires. Special care must be taken when wiring the new unit in, otherwise you run the risk of blowing fuses in your car with the power wires
Adapters these days are fairly inexpensive (around $15-30AUD) and can be purchased from any auto shop. Like fascias, there are a multitude of adapters in the market for specific vehicles. If purchasing an adapter, make sure to quote your vehicle’s exact brand and year of manufacture to ensure that you’re getting an exact match.
The wires – what they all mean
For some customers, finding the correct adapter may be difficult. Alternatively, they would prefer not to use an adapter as it allows for greater versatility with wiring. In this case, the wiring loom needs to be cut and the wires to be soldered in.
Even though the unit has a number of wires, testing the wiring really isn’t as complicated as it may seem. In fact, there are really only six wires that need to be connected properly for the unit to be fully functional.
Red
Otherwise known as the voltage ignition wire, the red wire is responsible for turning the unit on and off in correspondence with the car’s ignition.
A lot of the time if the unit does not turn on, it means that the unit is not receiving any power. Connections to the red voltage wire should be checked. It needs to be wired to the car's ignition.
Yellow
Unlike the old analogue radios, modern digital radios need a constant source of power in order for them to memorize information like time and presets while the car's ignition is off. Otherwise known as the volt constant wire, the yellow wire ensures that any saved settings or radio stations will reappear when the car’s ignition is turned off and then on again.
If the unit is not memorizing settings, it means that the yellow wire is not connected properly. It needs to go to the positive of the car's battery.
Black
Also known as the ground wire, the black wire completes the electrical circuit between the unit and your vehicle. It prevents fuses from blowing and the unit from short circuiting. It is essential that the stereo is grounded before attempting to operate it.
The black wire needs to go to the negative of the vehicle's battery.
Pink/Blue
As a safety feature, most in dash stereos disable DVD/TV functions while the vehicle is in motion. However, recognizing that there is often someone else in the vehicle watching the screen aside from the driver, manufacturers of aftermarket in-dash systems came up with a way to get around the situation. Marked as the “brake” wire on the units that we sell, the pink/blue wire allows customers to watch DVDs while the car is in motion.
The “brake” wire needs to be grounded with the black. (See above.)
Two white wires
Just as important as the red and yellow are the two white wires at the back of the unit. They are responsible for carrying sound from the multimedia system to your vehicle's sound system.
Commonly when customers mention being unable to hear sound (but being able to see all functions working perfectly), it is either because of a loose connection to the car speakers or a fault in one of the white wires.
For those of you with reverse cameras, there is also the orange/brown/blue "reverse/back/cam in" wire. All it does is tell the head unit that there is an image being picked up by the reverse camera that needs to be shown on the screen. The head unit will then automatically show the rear image.
The reverse camera wire needs to be connected to the positive of your reverse light.
Credit and thanks
Thanks goes to Install Dr. for use of their wiring harness diagram. To learn more about installation, please visit their website for in-depth explanations and free downloadable PDF files.


